Thursday, March 29, 2012

Defiance Games - USMC

So, this is my first post with the new Blogger layout. I'm still getting use to it. Google shotgunned stuff all over the place. Anywho, I just found a new company called Defiance Games, who uses rapid prototyping to make their miniatures. Unlike more conventional methods of 3d printing a master for spin cast molds, they're actually spending a small fortune for an injection mold. For those who don't know, injection molding has the highest start up cost of the molding types, but also the cheapest per-run costs. The molds are generally aluminum, and last for a very long time compared to vulcanized rubber molds, which usually only last 50 to 100 spins. Defiance has done a nice job of cataloging the process of having a mold made, and you can read about it here. They haven't released the rules yet, but say they're entering the alpha stage. Here is a preview of the USMC line:
It's made from this 3d render:
My first impression is that I don't like the helmet. But beyond that, the proportions, weapon, and armor all look good. They aren't available yet, but are up for pre-order. The price? $30 for 24. That's right, 24 of these suckers is only $30. That's just over $1 per miniature. Not bad, if you ask me. They're also 100% manufactured in the USA. Probably not a big deal for people in the eastern hemisphere, but it helps with our situation here in the states. If you're interested in finding out more, or pre-ordering them, check out their website at www.defiancegames.com

Friday, March 23, 2012

Base Models

One of the major advantages of 3d modeling over traditional sculpting is the ability to produce a base model or component. This base model can be used to rapidly design alternate versions, accessories, and even different models that use the same dimensions or snap-together parts.

By making effective base models, you can greatly decrease redundancy and wasted time during production. Those who are familiar with video game design also know that it allows for the same rigging to be used for multiple models. I find it interesting that rigging seems to be absent from 3d miniature design, but more on that later.

So, what are base models and how can they be designed effectively?

Lets tackle the first question. A base model is simply a boiled down and very basic version of the final product. It has no outstanding details, but should convey a general feeling of what it is, be it a car, gun, human, house, etc. Remember that it still needs to have defining features, just not specific to an individual model.

Here is an example:


This is obviously a human male, but it doesn't contain any specific features. This could potentially be anyone.

Now how do we make effective base models? Remember, a base model is meant to save you time and reduce your work load. This means that you will need to focus on two points:

A) How will this model be used in the future? (basic geometry)
B) What features will be common among all the models? (details)

Question A is for the basic geometry. Say you're making an assault rifle, as an example. You might say that all rifles have a grip, a trigger, a charging handle, a barrel, and a magazine. So basic geometry should reflect all of these, right? Not quite. This is where you must evaluate your future designs that will be based on this model. If you are going to make a bullpup configuration, a conventional magazine well would then need to be moved:


In the above image, we see two rifles. The top rifle is a bullpup with its magazine behind the grip. The bottom is a conventional rifle with the magazine in front of the grip. Those of you who don't study firearms might be thinking "So what, just move the box back and call it good!" That's great if you're making low poly models for an RTS, but people want more detail in their miniatures.

If you move the magazine back, you also have to move bolt, and ejection port back, increase the size of the stock, and change the hand guard. Generally you'll need to shorten the barrel as well. So now you're doing a lot of work to retool a base model to fit the same item type. This is also true for organic models, cars, airplanes and everything else. You don't try to make an F15 fighter out of a cargo or biplane base.

So, you'll need to consider what you're finished product will be. Are you going to make 30 or 40 assault rifle variations? Get pictures of each weapon and sort them into groups by common features. A quick breakdown can give us:


Handguns

Semi-Automatic

Revolver

Assault Rifle

Standard

Bullpup

Rifles

Bolt Action

Automatic


So you see how this can break down into a lot of base models! This isn't necessarily a bad thing if you have a full art team, as some people will be making base models while others add detailing and finalize them. It can be a bit much for one person though, so it's a good idea to prioritize your models. Use just a single type until you've completed your goal, then branch out as you have time. Using the assault rifle example, you should pick only a couple types of weapons to begin with, such as semi-automatic pistol, standard assault rifle, and pump action shotgun. This gives you three base models to work with and keeps the scope of your project much more reasonable.

Once you've narrowed down your base models and their basic geometry, you can move on to the second point. Given a single base model, what will all of the final models have in common? It is important to compare each model and determine what similarities there will be between them. For example, all of your semi-automatic handguns may have recoil operated slides and round trigger guards. This is a detail specific to automatic pistols, but not other weapons.

For example:


You'll notice that, despite color, size, and model, each one of these handguns have striking similarities, especially when contrasted with revolvers. So the question is, why redesign the slide for each weapon? For miniature games (especially 15mm) these details need not be very specific or varied. You can replicate these subtle details over many weapons without the design becoming boring.

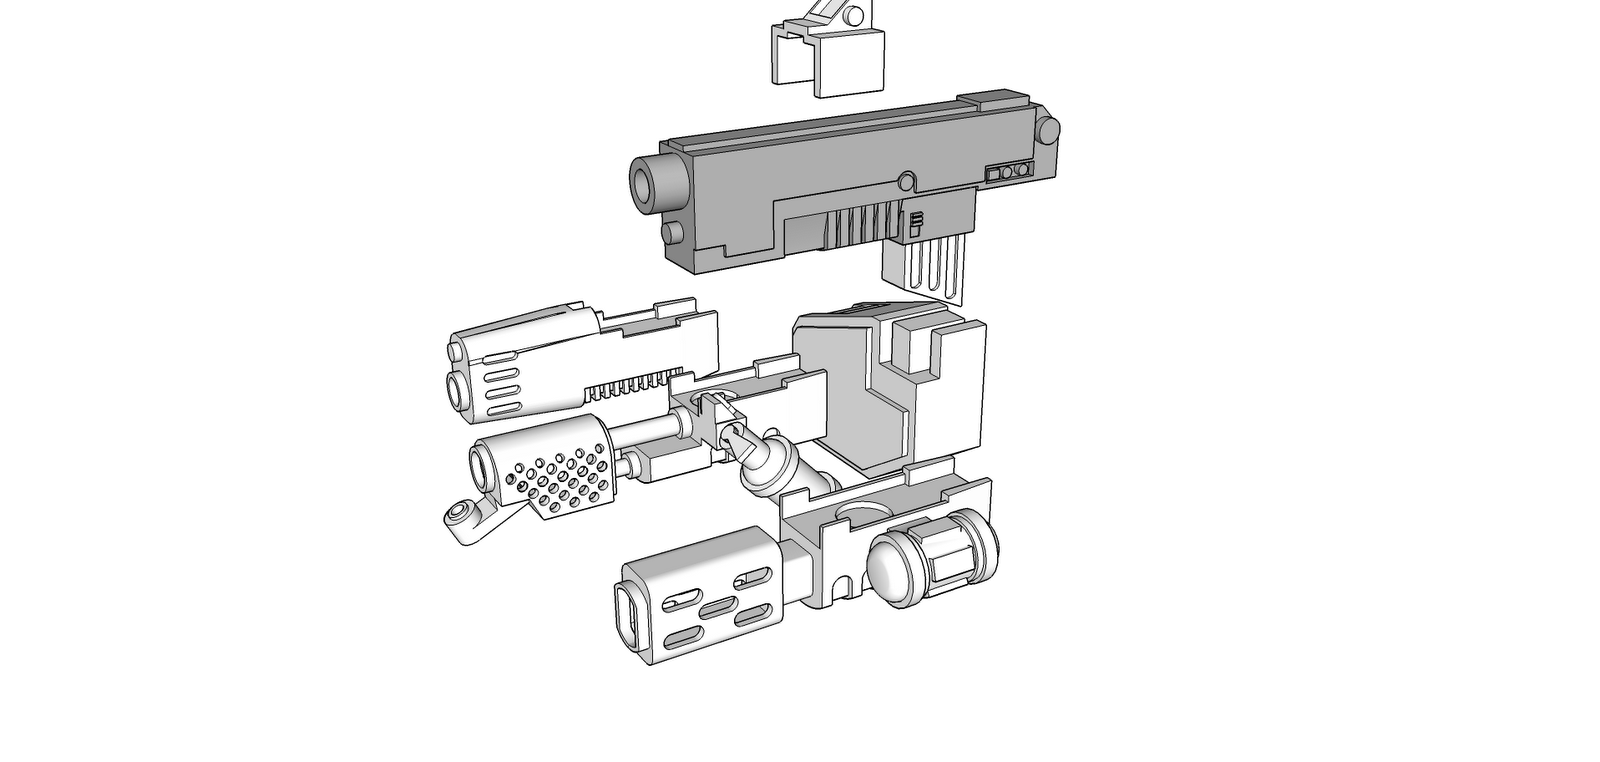
Consider the following example:


This is the base model I made of a Warhammer 40,000 bolter. I knew that if I made any alterations, they would not be with the charging handle, magazine well or grip (actually, its a specifically designed flat area, as space marine hands have the weapon grip molded into them. You just have to make certain to design the weapon to properly fit over the hand). I decided to extend out the barrel and add an integrated, bottom fed grenade launcher.


Notice how I was able to simply extend the front and model the grenade launcher? I didn't need to change any of the subtle details (though I did decide to take off the front sight aperture, as I felt it was redundant with a holographic sight). I then decided to completely break away from this concept. Using the same base model, I shortened the barrel length and added option "lock in" parts:


95% of the details on the bolter remained the same, with only a minor reconfiguration of the foregrip and bottom mount for combi-weapons.

Now, obviously you can decide to get crazy with your designs and make everything completely unique. It might even sound very good on paper. However, I have to advise against this. You're severely limiting your output and variety of models, plus you're reinventing the wheel with each model. Even if you don't specifically intend to produce multiple models or kits, making a base model can allow you to revisit designs or start over if you don't like the end result.

Even more important, if your clients like the work and want derivatives, you don't have to start over or dramatically alter the finished product. You'll have a large portion of the work already completed. You can then offer a discount on the work, or seriously cash in on an easy project (though you'll get more return work going the discount route).

As always, I hope this helps an thanks for reading!

Tuesday, March 20, 2012

The Importance of being Hollow

Let me start this with a bit of random trivia. A viagra knock-off company in India has generated 9 hits on my blog this week. Maybe they enjoy 3d modeling?

Anywho, as the title says, it's very important to be hollow. At least if you're a 3d model. See, all 3d printing companies charge per cubic centimeter of material that your model contains. This means that models can start to cost a lot of money. How much? Frosted Detail (FD) runs $2.39 US per cubic centimeter. If you wanted a high quality 16mm die, that would be 1.6cm^3 * $2.39 or $15.66 per die! Yikes!

To decrease this cost, we hollow out our objects so that they use less material. Generally this does not effect the component, since it's either too small to be effected, or meant for a prototype and will never be used.

*SAGE ADVICE* If you are planning on creating masters for mold making, you will want to be -VERY- wary of hollowing your models. Many mold making processes involve a lot of pressure and heat, and will result in a broken master and ruin mold if the model is too weak. Generally speaking, I advise anyone who plans on 3d printing masters to either use wax for bronze casting or make certain that your prints will be very solid, even if they do cost much more.

Alright, so lets look at the quick and dirty method of hollowing out an object. First open up the object you want to hollow out. In my case, it is a very fancy looking box magazine.

An important thing to keep in mind is structural integrity, both as a requirement for printing and for functionality. In the case of my magazine, it is going to be printed in Frosted Ultra Detail (FUD), which has a minimum wall thickness of .5mm (half a millimeter). In addition, it is meant as an accessory to a machine gun, so it must be able to lock into the machine gun's magazine well without breaking. This means I have to be careful about the guides I design to fit it in place:


First I'm going to copy the magazine by selecting the Move tool (or M) and pushing the ctrl key once:


Because I don't want to weaken the magazine guides, I'm going to remove them from the copy:


Now that it's cleaned up, I can scale it down, say, 15% using the Scale tool. To scale it exactly 15%, use the scale tool as normal, but type .85 in for the scale amount. If your remember math class from all those years ago, it means you are reducing a number TO 15% of it's original (or reducing it by 15%):


Now for the tricky part. we need to move the smaller magazine so that it is in the exact center of the original. We can do this by creating some center guides. But keep in mind that the smaller version won't light up exactly with the larger one, but we can still find a good fit by using the guides:


Now, hide part of the large magazine by selecting half of it, right clicking, and selecting Hide from the option menu. This will allow us to move the smaller magazine into place:


Remember your minimum material thickness, and measure to be certain. If you believe some areas may be too thin, just scale down the model by 5%. Once everything looks good, select the entire model, right click on it, and select Reverse Faces from the menu. This will make the distinction between the inner and outer walls:


Almost there!

Now Select both models by drag selecting. Right click them and select Explode from the option menu. This will break both of them out of the component state, and allow them to be recombined as a single model:


And that is the cheap and easy way to hollow out a model. You can actually hollow very complex models in a similar way. However, not all models can be hollowed using this method, but I'll cover that in another blog post.

Until then, thanks for reading!

Wednesday, March 14, 2012

Working with round objects part 3

Alright, let's go ahead and wrap up this tutorial. Hopefully you've been practicing what you've learned. Bring up the interior section of the shoulder pad. Using the same techniques we learned in the last tutorial, go ahead and make the exterior of the shoulder pad using the proper dimensions (9.6x5.3).

You should have something that looks like this:


Go ahead and use the Move tool to align the interior shoulder pad with the the exterior:


Select both components with the Select tool. Right click on them and choose Explode:


Then Right click again and select Intersect Faces > With Selection:


Now simply select the bottom line of the interior shoulder pad and delete it:


Now you have the basic outline of a shoulder pad! You can either use this as a blank, or use surface and joint push/pull tools to further edit it. If you haven't already, head over to Sketchucation and download the required plugins:

FredoLib (Required for these tools) - http://forums.sketchucation.com/viewtopic.php?t=17947
Joint Push/Pull - http://forums.sketchucation.com/viewtopic.php?t=6708
Tools on Surface - http://forums.sketchucation.com/viewtopic.php?t=11212

If you are installing these for the first time, you'll need to restart sketchup (don't forget to save your work!).

Now we can make a kind of "stock" shoulder pad to see how it looks. Use the Draw Offset Contours On Surface tool to select a patch of shoulder pad:


Then use the Joing Push/Pull tool to either push the shoulder pad in or drag the border out:


Here are some things to look out for-

If you push the shoulder pad in to make the size more correct to the original, it caves the top shoulder pad border. You will need to manually straighten the top section so it looks correct:


Pulling the borders out allows them to remain smoother, but increases the size of the shoulderpad and creates interior problems that have to be cleaned up:


Now that you have a blank prepared, you can either create objects to attach to it, or use 3d text. Pretty neat huh?

Try playing around with the shoulder pad and see what you can do using surface tools and merging other 3d objects to the rounded surface.

Quick Update

I was pretty sick and wasn't able to update the blog. Not to worry, I'm still working on it. I'm going to updated ASAP with more on shoulder pads... and stuff.

Monday, March 12, 2012

Working with round objects part 2

Now that we have the basics down, lets look at something that puts these ideas into practice, such as a space marine shoulder pad. At first glance, the shoulder pad looks simple, right? Just make a circle, then a cone and you're 50% there.

I wish it were that simple.

Let me take a moment to point out an infinitely useful tool to have if you have your heart set on miniature design: a digital caliper. This inexpensive measuring tool will certainly save your bacon on multiple occasions, and it's worth knowing how to use one.

Anyway, I digress. We need to be diligent and make certain that our shoulder pad is going to fit on the intended model. The are two surfaces we need to make a note of. The first is the outer surface. This must be small enough to fit in front of the back pack, and the top must not come into contact with the marine's head. It is also a good idea to keep track of the size so it doesn't get out of hand and look ridiculous on the model.

The second, and by far most important surface, is the inner section where the shoulder pad is glued to the arm. The angles MUST be very similar to the shoulder so that the pad makes good contact and remains in place when glued. If there is too much variation, the shoulder pad could fall off or decrease the spacing between the backpack and the outer surface.

Remember your crusty old shop teacher when he said measure twice and cut once? Measure 3 times and print once is the saying here. If you don't measure correctly, it could cause a lot of pain and hours of wasted work.

As you take measurements, make certain to write them down in clear, concise fields on a notebook. I'll probably do a section on keeping your data organized in the future. Basically, you don't want to have to go back and remeasure everything if you start on a new model.

Areas to measure:

Measure the height and width of the interior and exterior sections.


Next, take two shoulder pads and push them together so that they look like this:


The first thing you should notice is that it is asymmetrical. That means that simply using the previous methods will not create a workable shoulder pad. For this, we have to introduce a couple new tools.

Before we do that, however, I need to make a quick comment about scaling. Make certain that everything is in Meters, not millimeters. Sketchup does not work well with small dimensions, but can very easily scaled a model in meters down to millimeters.

First, start by creating a circle with the Circle tool. Give it a radius of 3.075 (giving a full diameter of 6.15):


Next, use the Guide tool to make a guide in the center and a mark at 7.6m:


This shows how much larger the circles needs to become to form into the oval shape of the interior shoulder pad. However, we are not ready to change its size just yet. Before we can do that, we need to add height and then volume.

Make another circle inside of the first circle with the same dimensions:


Once you have done this, mark the center portion with the Line tool to divide everything:


Delete the excess lines by using the Select tool and the delete button on your keyboard:


Alrighty, now it's time to make one more guide. This one will be 6.75m to the top of the shoulder:


Ready to add volume? To do this, we just draw a line down the middle of the second circle to divide it in half, and then delete that half, then use the follow me tool to make a half cylinder. Don't forget to use shift to select both sides of the cirlce:


So far, so good. Now its time to stretch the model to the right proportions. Select the model with the Select tool, and then click the Scale tool. Drag the model until it touches the guides:


And now we are very close to having the interior completed. To do this, we need to divide the model in half, but also retain a face on the flat surface. The quickest way I've discovered to do this, is simply draw a square in the middle of the model using the Square tool:


Using the guides that are already in place is the best way to keep the square perfectly centered. Once this is completed, drag select the entire model, right click on it, and select Intersect Faces > With Selection. The model will be deselected, but if you select any portion of it, you'll noticed that everything has merged. Delete the square and half of the model:


Congratulations, you now have the interior section of a shoulder pad! I recommend saving this as component. I'll cover component usage in another blog post.

We'll finish up the shoulder pad tomorrow, but see if you can do it on your own, using what you have learned so far.