So, I've been getting a really bad pain in my right arm thanks to my awful posture. I broke the right armrest clean off the chair, and then finally broke the backrest around the time the pain creeped up my neck. So, I tossed the chair out and did some craigslist hunting. I found one for $10 that's so comfortable I think I could melt into it. I've seriously never had a chair this comfortable in my life. It needs one bolt where they lost the lock for the right armrest, but that's all of what, 30 cents?
Because of this, I've tried not to do too much hard core modeling. However, I did decide to work on an interactive mech lab for Mechwarrior Online. What exactly do I mean by "interactive"? Well, here is a quick tech demo:
Not too pretty, and lots of work to be done. Expect it to be multi-platform (Windows, Linux, MacOS) but not mobile.
Sadly, the elevator of all things is giving me problems. Poor Bill never saw it coming. You know, you show up for work thinking the maintenance guys have been doing their job, and you go through the same procedure that you've done a thousand times before. Then this happens:
The doctors said that the swelling will go down in a few weeks, but he'll have to pee sitting down for the rest of his life.
Seriously though, still putting everything together, despite the pain in my arm. I did order an ergonomic mouse and gel wrist pad, so hopefully that will help out for those marathon modeling sessions.
I'll post more when I have it. Until next time!
Showing posts with label 3d. Show all posts
Showing posts with label 3d. Show all posts
Monday, September 9, 2013

Thursday, August 1, 2013
Using Sketchup to Design Game Models
Disclaimer: I'm not an industry veteran or 3d instructor. I'm merely sharing my set of experiences to anyone who is interested.
Purpose: I've been noticing a distinct pattern of misinformation and plain bias related to using Sketchup to produce game assets, specifically towards Unity (as that is the engine I've currently been developing on). The greatest cause for this happens to be the lack of any good information relating to how Sketchup works and what it can actually produce. Because it's designed primarily as an architectural tool, not generic 3d modeling platform, most of the Sketchup veterans have no interest in game design. Likewise, most game design veterans are loath to use a program that is not 3ds Max or Maya.
I've decided to attempt to dispel many of the rumors and clear up misinformation surrounding the use of Sketchup for game design. This paper, if you can call it that, is broken up into 3 sections - comparison, usage, and conclusion. Hopefully you, as a reader, can walk away from this with a tad more understanding of how Sketchup fits in the game development process. Bear in mind that Sketchup is not an all inclusive tool, not by any stretch of the imagination. Even if you do decide to use it, you'll need additional tools.
Easy to learn.
Excellent for hard surface modelling.
Non-alpha texturing.
Component design and manipulation.
Generally spline based modeling.
Automatic Topology management.
Free*.
Extensive Plugins.
Poor organic modelling.
No advanced tools (UV wrapping, rigging, poly painting, etc)
Exports to Collada*.
No manual Topology editing.
If you're new to 3d modelling, you're probably wondering what all that means, so lets go over it briefly.
Hard Surface vs Organic Modelling: Imagine in one hand you have a rubik's cube and in the other you have an apple. Now, at first glance these are both "hard surface" objects. But when we discuss hard surface and organic in 3d modelling, we are referring to the complexity of the geometrical shape - or how many curves are on a surface. In the case of the rubik's cube, it's completely flat along each side. Even if we were to turn one of the sections, it would still be composed of entirely straight edges. The apple, on the other hand, is not even symmetrical. It is oblong and mostly rounded, but also curves in at the top and bottom. It has small dimples and imperfections that cause the surface to be rough.
However, do not mistake organic for explicitly meaning only biological entities. Consider a modern car and and a cyborg from the Terminator series. Both are inorganic - that is, they're just machines. But the terminator is still an organic model, with all the complexities of a human skeleton.
This is organic:

This is hard surface:

Sketchup is capable of creating organic models, and there are plugins to make this much easier. It is far simpler, however, to limit any type of organic modeling you do with Sketchup to a minimum, as you're trying to reinvent the wheel at that point. It is much more expedient to use a program like zBrush that was designed specifically for creating very detailed organic models in little time.
Texturing: Sketchup uses a very primitive surface texturing system that applies a single layer to a single, continuous surface. This means you can't brush in fading paint or specific detailing. The following image shows how Sketchup divides a surface based on lines. These lines denote what is a continuous surface. As you can see, it's impossible to bleed one texture into another for any kind of fading effect.
This entire object is a single surface with arbitrary lines placed on it. Note how the texture simply stops at the line. There are plugins to convert surfaces to quads and perform primitive unwrapping, but they are spotty at best, and highly unreliable. As a general rule, you will want to use another program, such as 3ds max, blender, or zBrush if you want to create a high quality texture for the model. Sketchup is also incapable of adding additional alpha textures, so you can't do bullet holes and blood splatters as decals.
Component Design: The strongest part of Sketchup is its component system. Starting with nuts and bolts, it is possible to design an entire component hierarchy where every part of a car is quickly and efficiently reusable. And this transfers between projects. An artist designing motors on his machine can export them as components for separate artists to bolt onto frames, who can then export those components to the body designer. Because all of these parts are reusable and rapidly re-sizeable, artists can produce buckets of interchangeable parts.
When a component is edited, it updates all instances of that component in the scene, reducing the time it takes to fix mistakes. Finally, it allows for extremely fast prototyping. A group of artists can collaborate, sharing components to snap together mockups of different objects and generate scenes with very little time or effort.
Topology Management: Sketchup automatically manages all the topology in a model. This is both good and bad. Topology in Sketchup is almost always clean by default, even when doing some pretty weird things. But in the even that you want to manually adjust the topology, you're out of luck. However, given the nature of Sketchup, this shouldn't be an issue. Your geometry should remain fairly basic, as will be outlined in the next section. A good thing to remember is that Sketchup is purposely simple. You shouldn't be doing anything too complex with it.
Plugins: The final, and possibly most important, characteristic of Sketchup is its robust plugin system. There are a considerable number of plugins that make modeling easier. The vast majority of these plugins are produced by the community, generally free and regularly updated. Keep in mind though, these plugins may become abandoned at any time, and therefore cease to function as intended.
*There is a professional version of Sketchup that costs money, but includes the ability to export to .obj and .stl natively.
Getting a Model Into Unity: I don't recommend using Sketchup for conventional game models. You can't control their level of detail (LoD), you would still need a 3d modeling suite to rig and animate them, and they will have only basic texturing. However, that said, they are excellent for terrain, mockups, and any game that doesn't require animations.
You can, for example, make item drops, along with their inventory icons rather quickly. Make a basic item (remember, we're looking for hard surface models that we can make very quickly). This sword took me only a couple of minutes to model:

Note that it's untextured and rather bland. From here, you can open photoshop or gimp and make yourself some basic texture sets. Because this is a sword, I made mostly metal textures to apply. Then, open the Materials section of Sketchup (it's the paint bucket in the tool bar) and click the new material button (the + in the upper right corner). From here, just add the texture you made and name the material:


Purpose: I've been noticing a distinct pattern of misinformation and plain bias related to using Sketchup to produce game assets, specifically towards Unity (as that is the engine I've currently been developing on). The greatest cause for this happens to be the lack of any good information relating to how Sketchup works and what it can actually produce. Because it's designed primarily as an architectural tool, not generic 3d modeling platform, most of the Sketchup veterans have no interest in game design. Likewise, most game design veterans are loath to use a program that is not 3ds Max or Maya.
I've decided to attempt to dispel many of the rumors and clear up misinformation surrounding the use of Sketchup for game design. This paper, if you can call it that, is broken up into 3 sections - comparison, usage, and conclusion. Hopefully you, as a reader, can walk away from this with a tad more understanding of how Sketchup fits in the game development process. Bear in mind that Sketchup is not an all inclusive tool, not by any stretch of the imagination. Even if you do decide to use it, you'll need additional tools.
Comparison
Lets begin by outlining the basic characteristics of Sketchup:Easy to learn.
Excellent for hard surface modelling.
Non-alpha texturing.
Component design and manipulation.
Generally spline based modeling.
Automatic Topology management.
Free*.
Extensive Plugins.
Poor organic modelling.
No advanced tools (UV wrapping, rigging, poly painting, etc)
Exports to Collada*.
No manual Topology editing.
If you're new to 3d modelling, you're probably wondering what all that means, so lets go over it briefly.
Hard Surface vs Organic Modelling: Imagine in one hand you have a rubik's cube and in the other you have an apple. Now, at first glance these are both "hard surface" objects. But when we discuss hard surface and organic in 3d modelling, we are referring to the complexity of the geometrical shape - or how many curves are on a surface. In the case of the rubik's cube, it's completely flat along each side. Even if we were to turn one of the sections, it would still be composed of entirely straight edges. The apple, on the other hand, is not even symmetrical. It is oblong and mostly rounded, but also curves in at the top and bottom. It has small dimples and imperfections that cause the surface to be rough.
However, do not mistake organic for explicitly meaning only biological entities. Consider a modern car and and a cyborg from the Terminator series. Both are inorganic - that is, they're just machines. But the terminator is still an organic model, with all the complexities of a human skeleton.
This is organic:

This is hard surface:

Sketchup is capable of creating organic models, and there are plugins to make this much easier. It is far simpler, however, to limit any type of organic modeling you do with Sketchup to a minimum, as you're trying to reinvent the wheel at that point. It is much more expedient to use a program like zBrush that was designed specifically for creating very detailed organic models in little time.
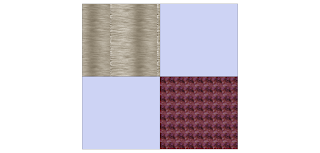
Texturing: Sketchup uses a very primitive surface texturing system that applies a single layer to a single, continuous surface. This means you can't brush in fading paint or specific detailing. The following image shows how Sketchup divides a surface based on lines. These lines denote what is a continuous surface. As you can see, it's impossible to bleed one texture into another for any kind of fading effect.

This entire object is a single surface with arbitrary lines placed on it. Note how the texture simply stops at the line. There are plugins to convert surfaces to quads and perform primitive unwrapping, but they are spotty at best, and highly unreliable. As a general rule, you will want to use another program, such as 3ds max, blender, or zBrush if you want to create a high quality texture for the model. Sketchup is also incapable of adding additional alpha textures, so you can't do bullet holes and blood splatters as decals.
Component Design: The strongest part of Sketchup is its component system. Starting with nuts and bolts, it is possible to design an entire component hierarchy where every part of a car is quickly and efficiently reusable. And this transfers between projects. An artist designing motors on his machine can export them as components for separate artists to bolt onto frames, who can then export those components to the body designer. Because all of these parts are reusable and rapidly re-sizeable, artists can produce buckets of interchangeable parts.
When a component is edited, it updates all instances of that component in the scene, reducing the time it takes to fix mistakes. Finally, it allows for extremely fast prototyping. A group of artists can collaborate, sharing components to snap together mockups of different objects and generate scenes with very little time or effort.
Topology Management: Sketchup automatically manages all the topology in a model. This is both good and bad. Topology in Sketchup is almost always clean by default, even when doing some pretty weird things. But in the even that you want to manually adjust the topology, you're out of luck. However, given the nature of Sketchup, this shouldn't be an issue. Your geometry should remain fairly basic, as will be outlined in the next section. A good thing to remember is that Sketchup is purposely simple. You shouldn't be doing anything too complex with it.
Plugins: The final, and possibly most important, characteristic of Sketchup is its robust plugin system. There are a considerable number of plugins that make modeling easier. The vast majority of these plugins are produced by the community, generally free and regularly updated. Keep in mind though, these plugins may become abandoned at any time, and therefore cease to function as intended.
*There is a professional version of Sketchup that costs money, but includes the ability to export to .obj and .stl natively.
Usage
Now that we're a bit more familiar with Sketchup, lets look at how it works in practice.This won't be a comprehensive tutorial, but should serve as some basic guidelines for using Sketchup and Unity.Getting a Model Into Unity: I don't recommend using Sketchup for conventional game models. You can't control their level of detail (LoD), you would still need a 3d modeling suite to rig and animate them, and they will have only basic texturing. However, that said, they are excellent for terrain, mockups, and any game that doesn't require animations.
You can, for example, make item drops, along with their inventory icons rather quickly. Make a basic item (remember, we're looking for hard surface models that we can make very quickly). This sword took me only a couple of minutes to model:

Note that it's untextured and rather bland. From here, you can open photoshop or gimp and make yourself some basic texture sets. Because this is a sword, I made mostly metal textures to apply. Then, open the Materials section of Sketchup (it's the paint bucket in the tool bar) and click the new material button (the + in the upper right corner). From here, just add the texture you made and name the material:

Then apply the materials to your object. Here, I applied the textures and separated out the components so you can see how I could quickly make custom blades, cross guards, grips, and pommels for a huge variety of swords:

Here is the interesting part - if you were to export the model without doing any coloring or texturing, every surface appears as its own object in unity. This makes the model both unusable and highly unwieldy. Thus, if you are going to use any model made in Sketchup (no matter how you export it) you must apply some color to it, even if it's white.This defines the object groups and makes it manageable.
Also, make certain your item is as close to the center of the axis as you can possibly make it. Otherwise, Unity will not be able to rotate it properly. Keep in mind that blue is "up" when imported in Unity. This means that all 3 colors should intersect in the middle of the object, and blue should come out of the top:

Now, at this point you have two options:
1) Get an obj exporter plugin.
2) Use the native .dae or .obj exporter (depending on whether you have the free or pro version respectively).
I personally use the .obj exporter at the moment because it spits out the textures in a usable folder as well. But again, it's not necessary as you can just as easily create the Unity materials from your existing texture files.
Using GIMP or photoshop, you can also create a sprite sheet:

You're not quite done yet if you want to use this to quickly generate icons. If you're interested in doing this, I have a decent write up for it here. Otherwise, drag and drop your object into your Unity project and follow the usual steps to texture it (make a material for each texture and apply it). From here you can throw together a lot of prefabs:
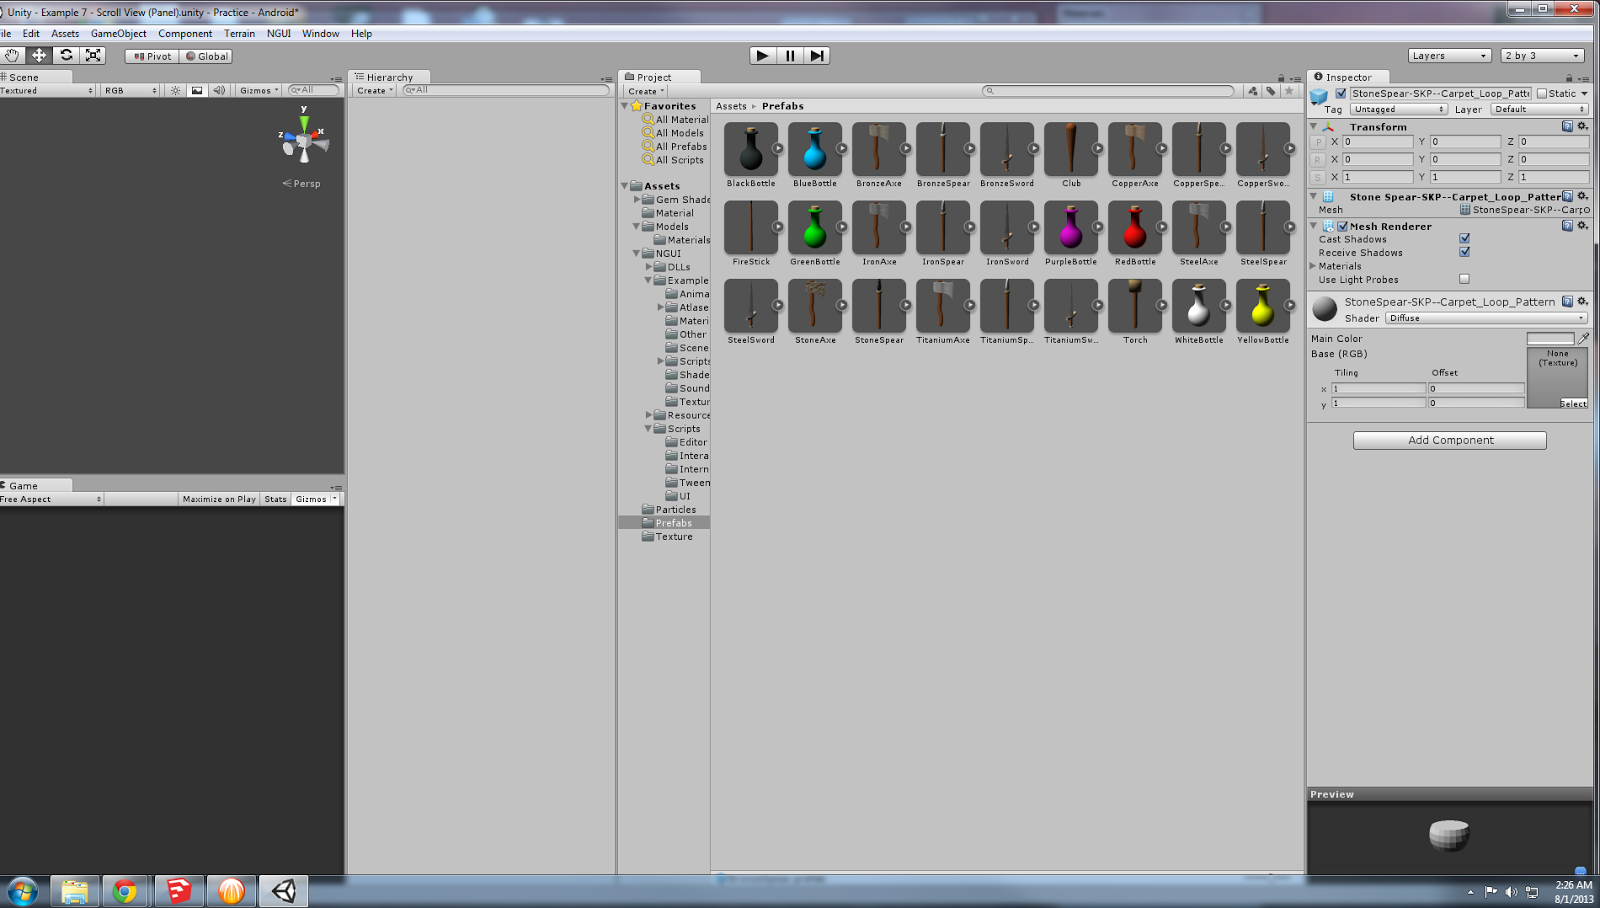
Now, for the million dollar question - are these items legit? As in, can they be used just like any other swords in a game? Yes! In fact, here is a tech demo that features models made and textured in Sketchup. Keep in mind, it's just a tech demo and very, very far from a polished game.
Conclusion
This outlines exactly how it is possibly to rapidly produce models, either as mockups or finished products, for your game using Sketchup. A professional studio may find fewer uses for Sketchup, but many studios do actively use it as part of their design pipeline. Indie developers can make even better use out of this free tool, rapidly creating background and environmental assets that don't require a great deal of detailed textures or animations, or by importing it into blender for texturing (as Sketchup is far easier to create the base model with).
It's also possible to use Sketchup to design your primary art assets if they don't contain animations. Tanks, helicopters, star fighters, even spaceships are all easy to design, texture, and plug into a game without any kind of budget. Indeed, the ease of use makes it excellent for new developers to begin with, and prevents them from launching into a game that will simply be too complex (IE, prevents them from embarking on yet another MMO) by forcing them to choose a much more simple game.
Sketchup isn't without its drawbacks, but any tool that works is a tool worth having, especially if its free.
Sunday, May 12, 2013
Galaga For the 21st Century
Remember that old game Galaga? Sequel to Galaxia and grandson of Space Invaders? I'm building a game somewhat along those lines, but much improved over the old barcade game of yesteryear. How so, you ask? Well, I'll not divulge all the secrets, but stay tuned for an interesting link.
Creating models for 3d games is much more involved than 3d printing, but in some cases much easier. The difference lies in the detail of the 3d geometry. Rendering geometry in real time is very expensive for games (hardware wise). Increasing the poly count (polygons are a unit of detail used to measure models in many 3d applications) requires more video processing and memory. Moving those extra polygons requires exponentially more calculations as well.
To alleviate this problem, meshes for games are actually rather bland. Instead of using detailed geometry, a process called normal mapping is used, wherein a special texture is created that simulates light reflection. The surface of an object is detailed by how light is reflected (or not) off of the material. When the RGBA texture is placed over the normal map, you get color with simulated light reflection, which tricks your eyes into thinking there is much more geometry than actually exists.
3d printing, however, cannot benefit from this. If your mesh is not detailed, then the printed product will be equally bland. Thus, a lot of care must be taken when producing a model so that it's aesthetically pleasing without overwhelming the ability of the printer. As time goes on, I imagine 3d printers may have similar shortcuts to producing high quality textures without manually producing all of the geometry.
Here is a good example of a printable model vs a game model:

Creating models for 3d games is much more involved than 3d printing, but in some cases much easier. The difference lies in the detail of the 3d geometry. Rendering geometry in real time is very expensive for games (hardware wise). Increasing the poly count (polygons are a unit of detail used to measure models in many 3d applications) requires more video processing and memory. Moving those extra polygons requires exponentially more calculations as well.
To alleviate this problem, meshes for games are actually rather bland. Instead of using detailed geometry, a process called normal mapping is used, wherein a special texture is created that simulates light reflection. The surface of an object is detailed by how light is reflected (or not) off of the material. When the RGBA texture is placed over the normal map, you get color with simulated light reflection, which tricks your eyes into thinking there is much more geometry than actually exists.
3d printing, however, cannot benefit from this. If your mesh is not detailed, then the printed product will be equally bland. Thus, a lot of care must be taken when producing a model so that it's aesthetically pleasing without overwhelming the ability of the printer. As time goes on, I imagine 3d printers may have similar shortcuts to producing high quality textures without manually producing all of the geometry.
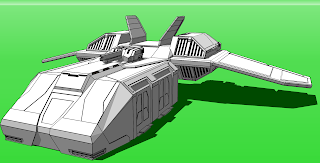
Here is a good example of a printable model vs a game model:
This is a detailed and printable Leopard Class Dropship from Mechwarrior (though admittedly I originally designed it for use as an icon).

This is a low poly model for a mobile game that I'm developing. It currently has no diffuse or normal mapping, just ETC1 texturing (that's right, not even RGBA!). This saves system resources to display additional objects on screen, apply physics, explosions, etc.

You can get a sneak peak at a very, very early build. This is pre-alpha stuff, and it's still missing 97% of the game. But most of the core mechanics are in: Space Game! Note that you'll need to install the small unity web player. I'm sure I'll update the game a few times as I complete the core mechanics.
Tuesday, April 16, 2013
Fallout Computer Prop
I'm currently working on an aforementioned project (very aforementioned) and created a kind of proof of concept model. This happens to be a computer terminal from Fallout 1 & 2. Those old cRPG players will recall the ubiquitous and massive computers dotted throughout the post apocalyptic landscape. They were ever the subject of frustration for players without adequate science to hack them.


This will be available in an unpainted 28mm heroic scale and a larger version to be announced eventually. It's only colored here for reference and comparison, though I used very basic textures. I'm also going to link my Shapeways page for those of you interested in buying my 3d models. I'd ask that if you have problems with the printing of the model (errors or broken parts) please contact Shapeways customer service. If you notice a problem with part size or fitting, let me know so I can get it fixed.
I'll let everyone know when this model is finalized and up on Shapeways. Enjoy!
UPDATE!: You can purchase the model on my Shapeways store now! I'll be adding even more items in the future for 28mm scale gaming.


This will be available in an unpainted 28mm heroic scale and a larger version to be announced eventually. It's only colored here for reference and comparison, though I used very basic textures. I'm also going to link my Shapeways page for those of you interested in buying my 3d models. I'd ask that if you have problems with the printing of the model (errors or broken parts) please contact Shapeways customer service. If you notice a problem with part size or fitting, let me know so I can get it fixed.
I'll let everyone know when this model is finalized and up on Shapeways. Enjoy!
UPDATE!: You can purchase the model on my Shapeways store now! I'll be adding even more items in the future for 28mm scale gaming.
Thursday, December 6, 2012
Boom Guns
How about something a little more familiar? Boom guns! Autocannons are a bit hit and miss in Battletech, and they're still undergoing a lot of balancing in Mechwarrior Online. Still, they're fun to draw :)


Livestream Online!
About to enter a livestream (5 minutes). You're welcome to come by and watch here.
I'll be working on stuff for the Mercpedia android app for the most part, but I might deviate a little bit. I also plan on doing this for quite a few hours (probably all day) with a couple of breaks in between.
Come check it out! :)
I'll be working on stuff for the Mercpedia android app for the most part, but I might deviate a little bit. I also plan on doing this for quite a few hours (probably all day) with a couple of breaks in between.
Come check it out! :)
Tuesday, December 4, 2012
UI Update
We're getting much closer to being done. The UI has a lot more polish and some of the icons have been added (finally):


This is actually moving along rather nicely. Certainly much faster than I thought it would. It's cool what you can learn in a year :)


This is actually moving along rather nicely. Certainly much faster than I thought it would. It's cool what you can learn in a year :)
Monday, December 3, 2012
3D to 2D art tutorial
This is a quick tutorial on how to make 2d art assets, such as icons, from 3d objects. For this tutorial, I will be using Sketchup and GIMP. Both of these programs are free and available on multiple operating systems, so anyone is able to get started.
1) Build the 3d model (this is beyond the scope of this tutorial because it is a very extensive subject. I do have information about it in older posts, and will most certainly continue to do so in future posts as well. Your finished model might look something like this:
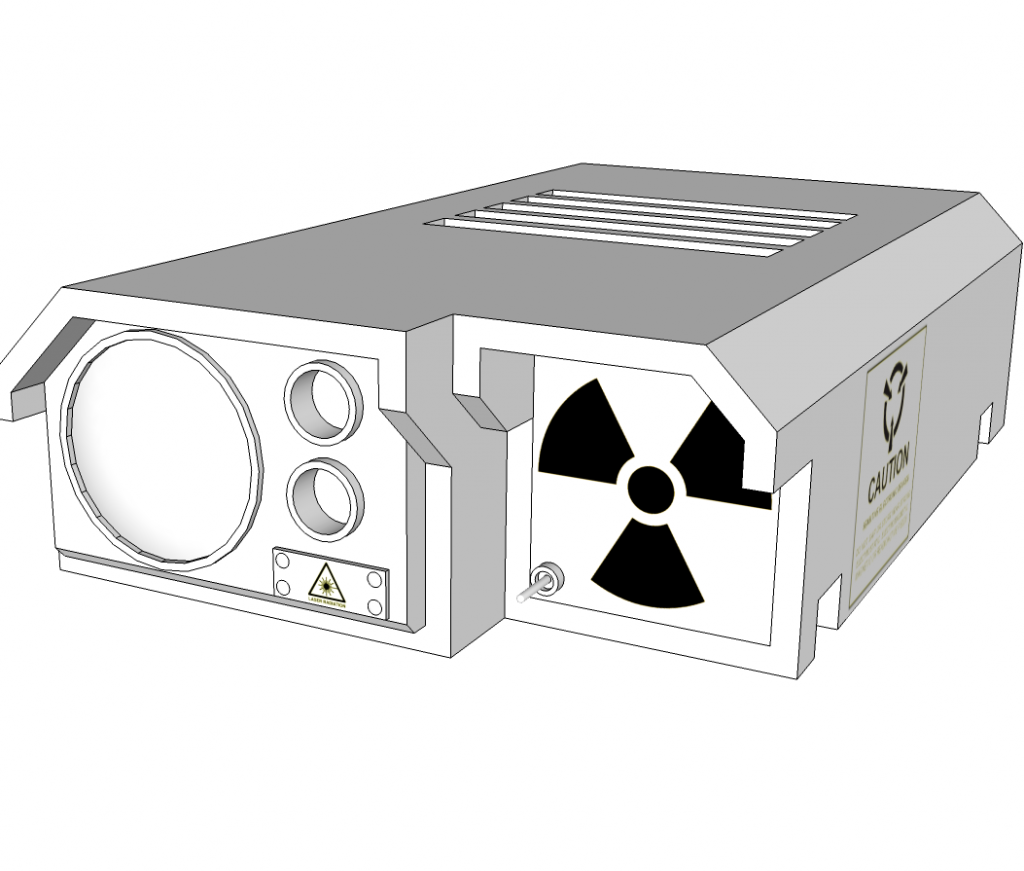
2) Make certain that View > Shadows is checked and fill the background with a bright color that will not be in your model. I use green (just like a green screen for movies). You can do this by going to Window > Styles and then making a new style. Go to the Background tab and check the Sky and Ground box, then set the colors for them.
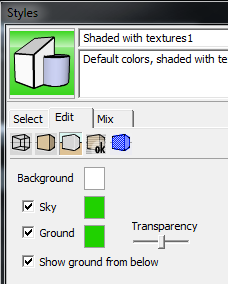
And it show now look like this:
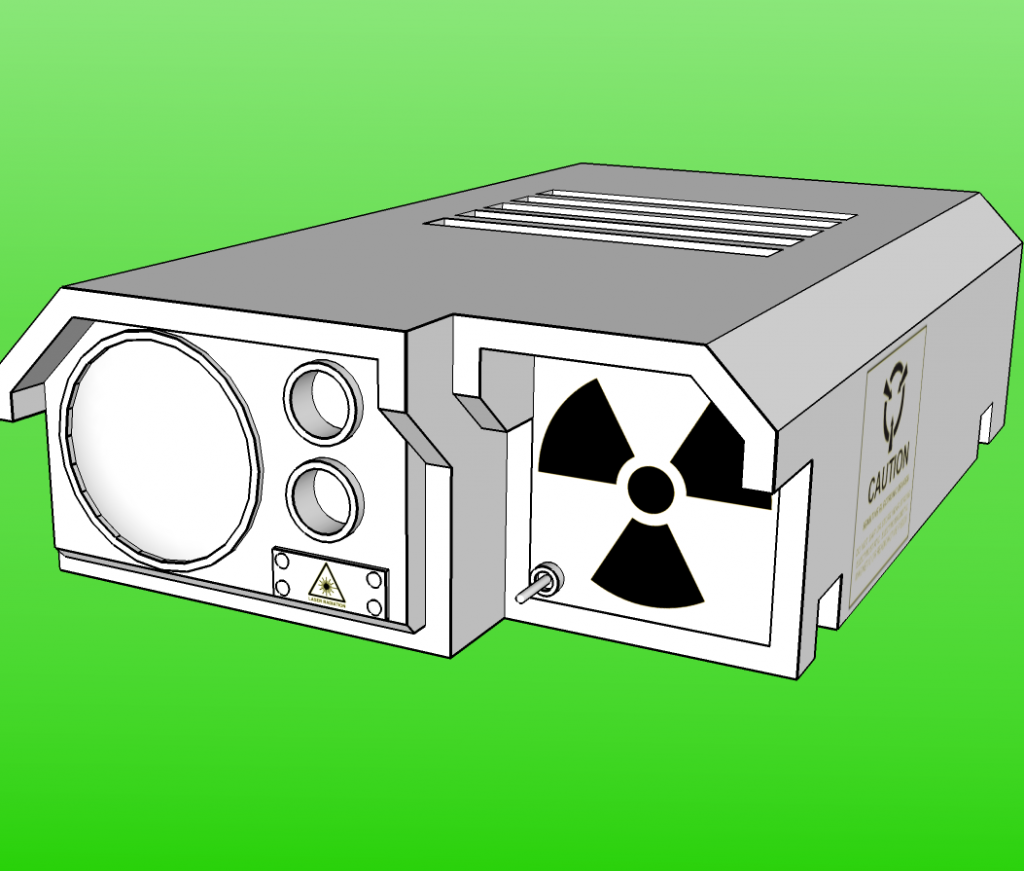
3) You need to export it to an image file so that GIMP can understand it. Sketchup also runs a very very basic rendering operation. It's basically applying anti-aliasing and smoothing to the image.
File > Export > 2d Graphic
Make certain to save it as a .png file.
4) Now, load it into GIMP and select the Select By Color tool from the toolbox. Select the green (you may have to select multiple sections to get all of it by holding the shift key) and delete the color completely. This will result in some left over residue:
Simply repeat step 4 on all the green pixels until they are gone.
5) Now use the fuzzy select tool to select all of the dead space, similar to how you selected the green in step 4.

When you have all the dead space selected, go to Select > Invert Selection. This will select your entire object without singling out dead space, color, etc.
6) Icons should always be a factor of 2 and square. That means you can always divide the pixel dimensions by 2 and the height and width are the same value. This means we need a canvas that fits these requirements.
Select Image > Canvas Size... from the top menu and change the dimensions to the nearest even number (you'll want to use the higher number if you have a rectangle). Note: Make certain the chain on the right side is broken! Otherwise, you will be forced to scale in the same ratio.
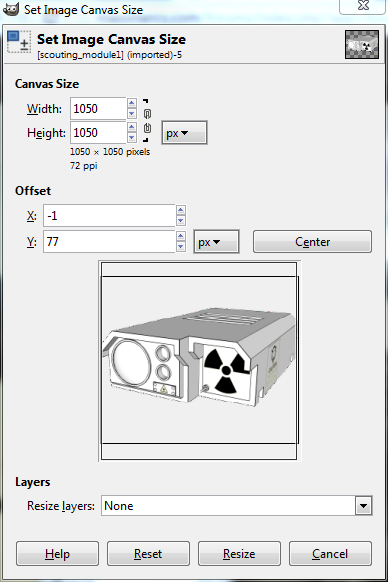
Make certain you press the Center button! Then press Resize.
7) Now we have the proper dimensions. In the layers window, right click and select Add New Layer twice. Name the first one Shading and the second one Lines. You should now have layers that look like this:
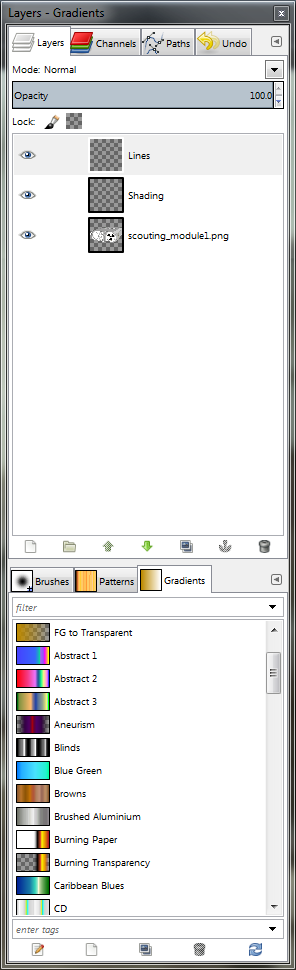
8) Select the bottom layer (it should have your image name or Background) and select all the dead space. Invert the selection just like step 5 (Select > Invert Selection). You should now have only the image selected.
Select the Shading layer by clicking on it and then click the Bucket Fill tool and select your desired color. I'm going to use one similar to the MWO theme.

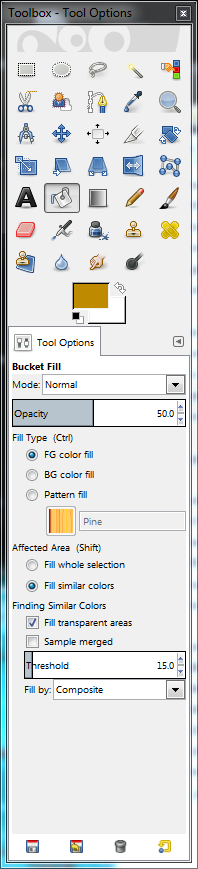
Set the Opacity to 50% and then click in the selected area in the main screen:
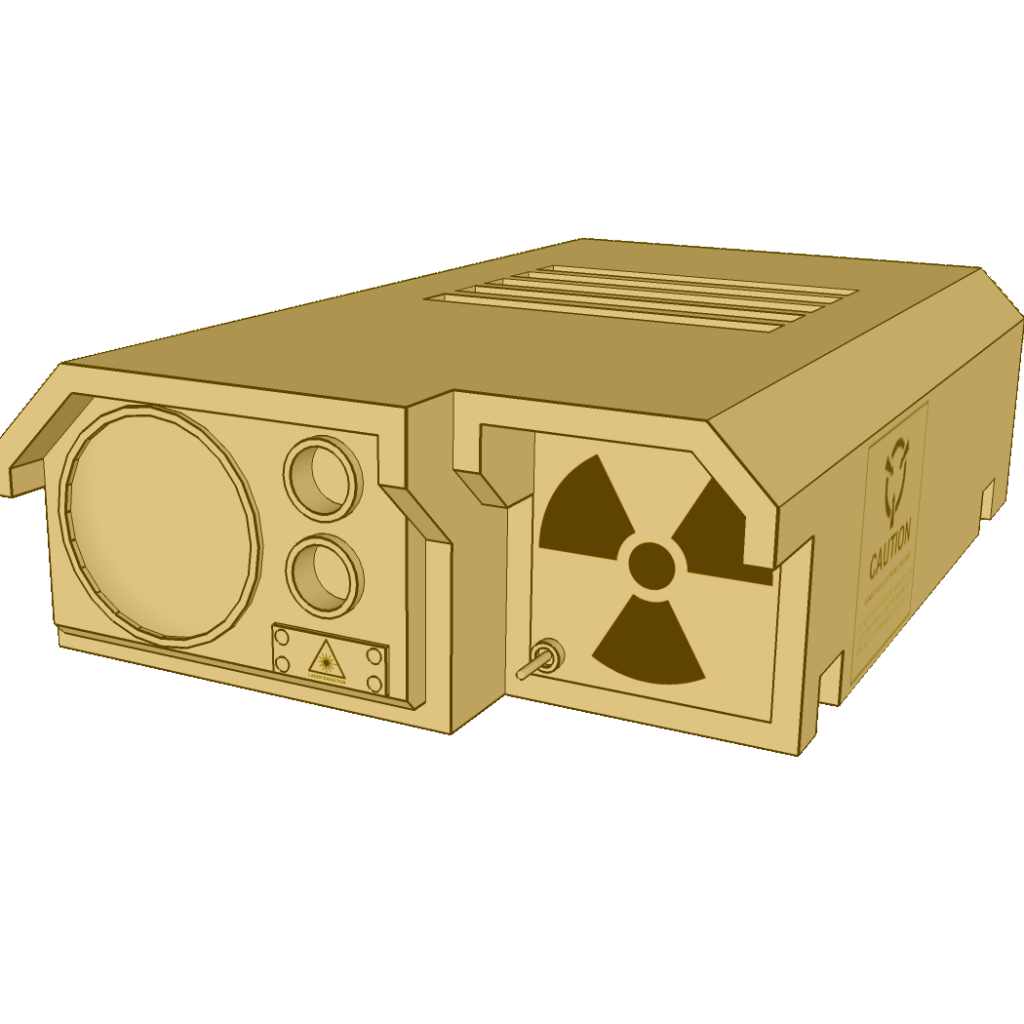
9) Now, this is good, but you'll notice the details are muffled, specifically the lines. So now we click on the Color Select tool again and make certain the bottom most layer is selected. Click on a black line anywhere in the image to select all black lines in the image.
10) Modify the Bucket Fill options so that Opacity is 100% and the color is Black.
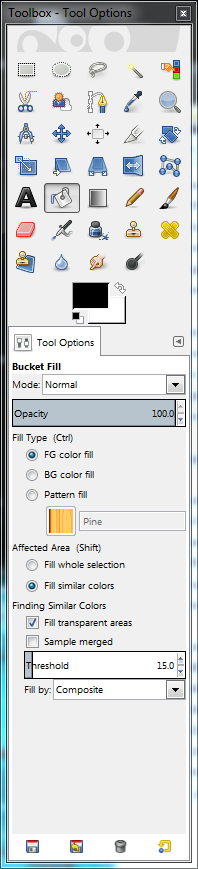
Then select the Lines layer by clicking on it. Now that it is in focus, hold the Shift Key and click inside your selection. Your image should now have much crisper detail:
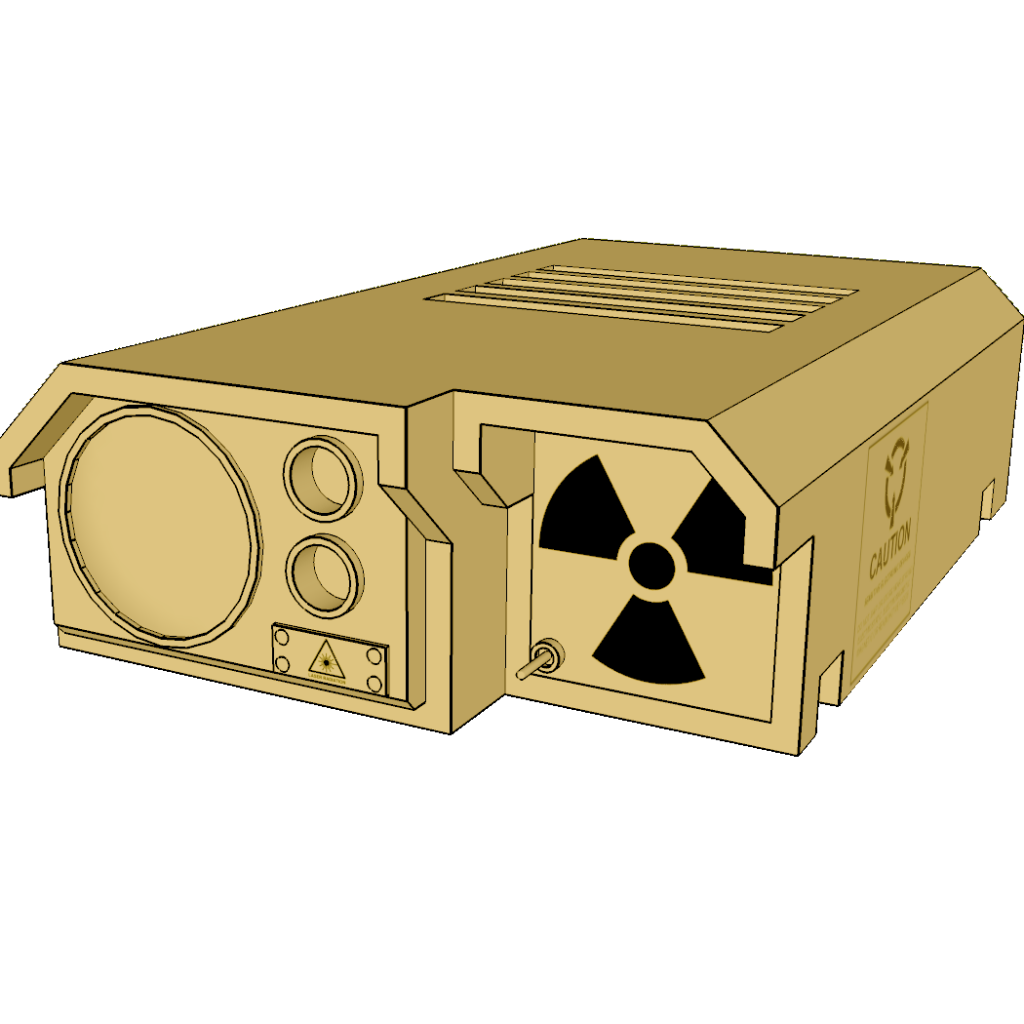
11) Last step! Simply select Image > Scale Image and set it to the desired icon size. I'm currently using 100 x 100 px:
And now you have an icon that's ready to use!
Some tips for consideration:
- Keep your final icon size in mind when designing your 3d model. It's possible to spend days making a professional model, but you'll lose 95% of that detail when you shrink it to an icon!
- Create your theme and color scheme before making finished icons. Otherwise, you'll end up fixing them all again, and again... and maybe even again.
- Save the .xcf file! Always, no exceptions! You can't edit layers once the image has been exported and flattened.
++++++++++++++++++++++++++++++++++++
Here are a few more icons I've made:


Monday, October 8, 2012
Teenage Mutant Ninja Turtles
EDIT: Fixed the LiveStream link.
I've been a fan of them for as long as I can remember, going back to the cartoon in the 80's. The newly released show inspired me to do a little extra 3d work to practice Sculptris a bit. Most of the process has been recorded and saved on my LiveStream channel.
I'm pretty close to being finished:

I still need to add a belt. I'll be putting it up on shapeways in a 1", 2" 4", and 6" version. I'm pretty pleased with the overall result. I think a number of things could be better, but that's why it's called practice :).
I've been a fan of them for as long as I can remember, going back to the cartoon in the 80's. The newly released show inspired me to do a little extra 3d work to practice Sculptris a bit. Most of the process has been recorded and saved on my LiveStream channel.
I'm pretty close to being finished:

I still need to add a belt. I'll be putting it up on shapeways in a 1", 2" 4", and 6" version. I'm pretty pleased with the overall result. I think a number of things could be better, but that's why it's called practice :).
Subscribe to:
Posts (Atom)